Troubleshooting
|
v Troubleshooting Ferro-Resonant (FR) Units
Having trouble with your charger?
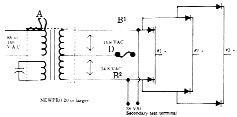
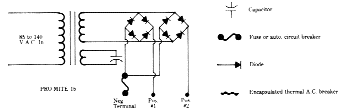
All ferro-resonant (FR) units consist of a transformer with a built in AC thermal breaker, and AC capacitor, diode pairs on heat sinks and a circuit breaker. All FR units are rated ‘Ignition Protected’ (U.S. Coast Guard Electrical Standard 33 CFR 183.410). All FR units can be dead shorted without ill effect and can be used in conjunction with the batteries to help start an engine. Voltage will not rise as on an ordinary transformer to hurt your alternator or electronics. All FR units are power supplies and will supply DC current without a battery in line up to rated capacity. All FR units are converters and will supply current to ‘house’ plus keep the batteries charged. All FR units can be installed in multiples to multiply performance. All FR units are rated self limiting and do not need to be circuit breakered on the output DC wiring. (We have a letter from the Coast Guard confirming this) (U.S. Coast Guard Electrical Standard 33 CFR 183.460[b]). All FR units are completely automatic between 85 VAC and 140 VAC or 240 +/-15% 50 HZ. Higher or lower input voltages are tolerated by the unique ferro-resonant transformer but the finishing voltages are higher and water will be boiled out of the batteries with the resulting excessive voltage if left unmonitored. On 60 HZ units, +/- 5% HZ will cause overheating at full output and will function well at 50 HZ if a circuit breaker with 3/4 of power supply rating is installed in negative line but finishing voltages will be 20% lower. A 240 VAC +/- 15% unit can be operated on 60 HZ as a non-automatic or fast charger. The finishing (or full charge while charging) voltage is set by the definite relationship between an exact number of windings of the three coils to an exact amount of core and cannot be adjusted. Resistance in the circuit or an in-line diode will drop voltage. (A diode equals approximately .6V drop) or 10 to 12 amps on an output stud with no battery in line will raise voltage to battery on other studs. No voltage increasing method is recommended by the factory. Our ferro-resonant charger continues to hum even though voltage has peaked at finishing charge. The charger replaces the amount of current normally dissipating (counter voltage). TROUBLESHOOTING YOUR CHARGER: Check voltage of batteries after 24 hours of charging. Should any voltage be under 13.4 (no load), exceed 14.1 or after charger is shut down, voltage drops under 12V within 15 minutes : (1) Check your voltmeter. (2) Check your batteries. On-Board Testing: 1. Does unit hum when AC is activated?
Any boiling under 14.2 V.DC while on a charger means your battery is probably defective. Test Bench Specifications: A voltage reading of 13.3 +/- .3 (12V charger) without a battery in line means the charger is functioning correctly. (A quality voltmeter might have spurious readings – place fingers across DC positive and negative.) If the battery voltage increases when AC is applied means the charger is functioning correctly and the finished charge will be a nominal 13.8 on a 12 VDC (no load). 27.6 on a 24 VDC system (no load) or 36.8 on a 32 VDC system (no load). Transformer unloaded should read less than one amp AC draw. If transformer does not hum: (a) check AC in. (b) check internal wiring to transformer. (c) by-pass internal thermal breaker (loop at point A). A failure of any component causes output to drop to 10V or less. Read AC output – Approx.. 29.5 volts AC between two #10 studs on plastic or between tip of two diodes on same heat sink . B1-B2. Approx 14.8 AC between one #10 stud on plastic to negative post of charger or from tip of one diode and circuit breaker or fuse, B to D. Read AC capacitor – should be over 400 VAC – (Do not touch -discharge with a screwdriver after AC is off). Check capacitor with one lead disconnected. Analog V.O.M. on R x 10,000 should jump to full scale then drop back to infinity. With AC off, batteries disconnected, and VoltOhm Meter on Rx1 – read from diode tip to heat sink. Leads one way should read 0 and the other approx. 60% of scale. 0 both ways or full scale both ways – replace diode. On 12V models with 2 extra studs in upper left corner of plastic panel marked ’28VAC Secondary Test Terminals’ one can connect a ‘transformer OK’ or ‘charger functioning’ indicator light. Maximum 15 watt (28V range) bulb. Test readings should be 27-30 VAC between these two terminals and approx 14.5 VAC between either terminal and the DC negative terminal.
12 V CHARGER TO 24V (voids warranty – consult factory – we manufacture 24V units) By removing the two diodes from one heat sink and replacing with two reverse diodes, this heat sink is 24V negative. This charger can charge either 12V or 24V but 12 and 24V negatives grounded in the same system will dead short inside of charger. (All units except Pro Mite 15/20). LEAD CALCIUM BATTERIES Higher finishing voltages are seen because of the much reduced internal resistance of lead- calcium (maintenance free – No fill tops). We do not recommend using lead-calcium batteries for deep-cycle or heavy-duty use and recommend that with ‘no load’ or no current usage situations that the charger be turned off. Lead-calcium will sit for six months to a year with little charge loss. Several weeks at 14.3 to 14.5 has not visibly deteriorated test batteries. Leaving a 12V bulb on will normally keep voltage below 14V which should not harm any battery over extended charging periods. TRANSFORMER NOISE SUPPRESSION With a battery in the system there should be no apparent noise in your radio. Using the unit as a power supply with no battery in line for an AM or SSB radio, there will be a slight audible hum which can be eliminated with an 18,000 MFD-25V capacitor. AMMETERS We do not believe an ammeter tells much on multi-output charger and also a charger is normally located where it can not be easily monitored. A six passenger boat for hire is required by Coast Guard regulations to have an ammeter in the charging system. To comply with regulations or as a skipper desires, a ammeter can be installed in any convenient location by extending the negative wire of the charger and placing an ammeter in the line. The total output of the charger can be observed. VOLTMETERS An accurate voltmeter, preferably expanded scale (Professional Mariner Electrical System Monitor) is an excellent means of monitoring your electrical system. Besides an accurate means of determining full charge from a battery charger, one can also watch for problems with the alternator systems or when charging systems are shut down, the condition of the batteries.
v ProTech Battery Charger Testing Procedure
ProTech Battery Charger Testing Procedure All you will need for this test is a voltmeter and the tools to connect and disconnect the batteries. 1. Power down the charger and disconnect all the cables from the batteries (or the charger) and making sure the battery cables are not touching each other. 2. Connect the charger back to A/C power. The charger should be in either the Fast Charge Mode or the Absorption Charge Mode. Check the voltage between each positive and negative lead (or common ground) and see if you get 14.6 volts (for lead-acid batteries) or 14.1 (for gel-cell batteries). 3. If you see this, leave the charger hooked up to AC but, do not hook up the batteries. Leave the charger on for the allotted number of hours as set by the (S1) dipswitches (you can safely leave the charger on over night). Go back to the charger. You should now have just the green light on. Recheck the voltage and you should now get 13.3 volts from each positive lead to the negative lead. 4. If you see all of the above, your charger is working fine. If you don’t see any of the above, your charger either has a blown fuse, or circuit board problem. You can remove the small cover (it has 4 screws on it), and the large cover with the fan on it (it has 6 screws). Remove the large cover carefully since the fan and the A/C terminal block is attached to the main circuit board. You should be able to see a glass cylinder fuse (A/C fuse).
If the glass fuse is blown you can try replacing it (the fuse says 250 volts—-however if your boat doesn’t leave the United States you can replace it with a 110 volt same amperage fuse). If it blows a second time when you power the charger back up, then something happened to the circuit board (which we don’t repair). If that is the case, depending on the age of the unit, we can pro-rate you a good price on a replacement charger.
v AllTech Battery Charger Testing Procedure
AllTech Battery Charger Testing Procedure You will need for this test is a voltmeter and the tools to connect and disconnect the batteries. 1. Power down the charger and disconnect all the cables from the batteries (or the charger) and making sure the battery cables are not touching each other. 2 Connect the charger back to A/C power. Check the voltage between each positive and negative lead (or common ground) and see if you get 14.6 volts (for lead-acid batteries) or 14.1 (for gel-cell batteries). 3. If you see this, leave the charger hooked up to AC but, do not hook up the batteries. Leave the charger on for 5 hours (you can safely leave the charger on over night). Go back to the charger, you should now have just the green light on. Recheck the voltage and you should now get 13.3 volts from each positive lead to the negative lead. 4. If you see all of the above, your charger is working fine. If you don’t see any of the above, your charger either has a blown fuse, or circuit board problem. You can remove the top cover (it has 4 screws on it), and the bottom plate with the terminals on it (it has 8 screws). Lift up the main cover with the meter on it being careful not to pull too hard—you don’t want to hurt the cable connecting the meter to the main circuit board. You should be able to see a glass cylinder fuse (A/C fuse) and a couple of blade-type car-like fuses (D/C fuses).
v ProTournament Battery Charger Testing Procedure
ProTournament Battery Charger Testing Procedure You will need for this test is a voltmeter and the tools to connect and disconnect the batteries. 1. Power down the charger and disconnect all the cables from the batteries. 2. Making sure the cables are not touching each other, connect the charger back up to A/C power and you should get a red light. If you get a red light, check the voltage between each positive and negative lead and you should get 14.6 volts (for lead-acid batteries) or 14.1 volts (for gel-cell batteries). 3. If you see this, leave the charger connected to the AC but, still Disconnected from the batteries, for 5 hours. You should have a green light by now. Again with you voltmeter, check the leads and recheck the voltage. You should now get 13.3 volts lead acid or 13.8 for Gel setting, from each positive to the negative. 4. If you see all of the above, your charger is working fine. If you don’t see any of the above you should call the service center to determine the best course of action.
v ProSafe 1 Monitor Installation Overview
ProSafe 1 The ProSafe 1 Monitor System consists of three components. The Zinc Saver, the Main Control Unit and the Display Panel. The Zinc Saver is spliced in to the green wire coming from the shore cable. There are two ¼” gold plated terminal studs on the right and left side of the unit. The stud marked SHORE GROUND is connected to the green wire going off the boat to the dock post. It is the only connection made to this green wire. The 1/4 “ gold stud marked BONDING SYSTEM is connected to the on board Main AC Grounding Buss. The Main Control Unit has four connections to be made. 1. The Brown (line) and Blue (neutral) are connected to the input side of the AC main breaker and the Green (ground) is connected to the AC bonding system buss bar. The AC NEUTRAL and LINE are used to power the monitor. The Neutral wire is also used in the ground wire test. 2. There is a small diameter “sense” cable with 4 pin connectors on both ends. This cable plugs into the main unit on one end and into the Zinc Saver on the other end. Through this cable the ground wire test and the Galvanic Isolator test are performed. 3 . The cable from the display unit plugs into the side of the Main Control Unit just next to the sense cable connector. Use of the ProSafe 1 Ground Wire, Galvanic Isolator Monitor Automatic Operation: To use your ProSafe 1 Monitor the following steps are suggested: Be sure your main AC panel breaker is in the off position. Also be sure your dock post AC breaker is in the off position. Attach both ends of the vessel shore cord, one end to the power inlet on your vessel, then the other to the dock post receptacle. Turn on the dock post breaker. The presence of AC on the input side of the Main Panel Breaker will activate the ProSafe 1 Monitor. After the ProSafe Monitor cycles through it’s test it will display the condition of the shore ground wire and of the Galvanic Isolator. The ProSafe 1 Monitor will repeat this test automatically every 3 hours. Interpretation of test results. The display consists of six LEDs, three green and three red. The three green LEDs should be lit to show proper polarity, good ground wire continuity and a good galvanic isolator. A Ground Wire Red LED indicates that the ground wire (green wire) is not connected to the shore properly. The fault can be caused by the green wire being open, or disconnected, by a bad connection at the Galvanic Isolator, shore cord plug, in the dock plug or even the metal tip of the plug itself not making good contact. It can also be caused by the ground wire not being connected to the neutral back on the dock (a requirement under the N.E.C. (National Electrical Code) A Galvanic Isolator Red LED indicates that there has been a failure of the Galvanic Isolator. The Galvanic Isolator can fail as a short or an open. As a short it will no longer isolate the boat in a low level DC manner and will increase your erosion of your zincs. As an open you no longer have AC ground protection to your bonding system. Both situations are cause for concern, the later being a life threatening situation. If the galvanic isolator shows a FAIL it should be replaced without hesitation due to this danger. With any of the above faults present and because of the possibility of high AC voltages on the bonding system it is highly recommended that the vessel’s shore cord be disconnected until a marine technician can determine and repair the fault. To silence the audible alarm: In the event of a Fail condition it is preferred to be able to use your 110/220 volt systems without the presence of the audible alarm it can be silenced by holding the test button in until the alarm silences. The alarm will stay silent while leaving the FAIL LED illuminated. This does not rectify the fail condition and it is still imperative that the reverse polarity condition, ground wire or Isolator be checked for a fault and the fault repaired. Troubleshooting Because of the presence of deadly high voltages troubleshooting should be done by qualified service personnel only. To troubleshoot a Reverse Polarity FAIL indication please follow these steps: 1. Turn off the AC panel “main breaker”. 2. Using a volt meter, check the voltage between the green wire and white/blue wire at the main breaker input side. If the reading is not less then 6 volts (typical) and is instead close to or over 100 volts AC this is an indication of Reverse Polarity. 3. If there has been no recent electrical work on the boat and/or you have moved to a different dock it is probable that the reverse polarity is caused by a mis-wired electrical outlet in the dock post. This can be tested by checking the voltage between the ground and neutral slots in the connector of the dock post using the same results as above. 4. It is important to rectify this problem as it is the first of two mistakes that in conjunction will cause there to be high voltage on the bonding system of the boat. To troubleshoot a Ground Wire FAIL indication please follow these steps: WARNING! DO NOT PERFORM THIS TEST IF THE PROSAFE 1 IS INDICATING A “REVERSE POLARITY FAIL”. INSTALLING THE JUMPER WIRE IN STEP 2 BELOW DURING A REVERSE POLARITY CONDITION WILL PUT HIGH VOLTAGE ONTO THE BONDING SYSTEM. THIS IS A LIFE THREATENING CONDITION! 1. Be sure the shore power cable is disconnected at the dock post. 2. Using a length of jumper wire (18 ga. or larger) connect one end to the neutral wire (connection location of the ProSafe 1 blue wire) and the other end to the shore ground wire (“AC Shore Ground” stud on the Galvanic Isolator). With the boat AC main breaker in the off position reconnect the AC shore cord to the dock post and turn on the dock post breaker. After the four second test the display should show a NORMAL condition on the “Ground Wire” indicator. With the display showing NORMAL during this simulation the problem could be a defective shore cable or shore cable connector or faulty ground/neutral connection dockside. In the event you are new at this dock and the ProSafe 1 has not given you a FAIL indication at your previous dockage it is likely, and has often been found that the ground and neutral at this new dock are not properly terminated. This situation will require the dock electrical be inspected. If the ProSafe 1 shows a fail during this test of the system then the ProSafe 1 has failed and needs replacement. 3. UPON COMPLETION it is imperative that you disconnect the shore cord from the dock post and then remove the jumper wire. Not removing this jumper is an infraction of the recommendations of ABYC and creates a danger of stray AC currents on the bonding system of the boat. To troubleshoot a Galvanic Isolator FAIL indication please follow these steps. 1. Disconnect the shore cord at the dock post. Check the connection point of the four wire connector to the Galvanic Isolator. Look for corroded pins or broken wires. Using a quality Digital Multi-Meter with the test selector in the diode test position test from stud to stud of the Galvanic Isolator. Test in both directions. Measurements should be between .8 volts and 1.0 volts with a difference between readings of less then 0.075 volts. For more information call 603-433-4440
v ProSafe Deluxe Monitor Installation Overview
ProSafe Deluxe The ProSafe Monitor System consists of three components. The Zinc Saver, the Main Control Unit and the Display Panel. The Zinc Saver is spliced in to the green wire coming from the shore cable. There are two ¼” gold plated terminal studs, one on each side of the unit. The stud marked SHORE GROUND is connected to the green wire going off the boat to the dock post. It is the only connection made to this green wire. The 1/4 “ gold stud marked BONDING SYSTEM is connected to the on board Main AC Grounding Buss. The Main Control Unit has four connections to be made. 1. The Red (+) and Yellow (-) are connected to the DC system on the input side of the DC main breaker. This is used to power the unit.
2. The Brown (line) and Blue (neutral) are connected to the input side of the AC main breaker and the Green (ground) is connected to the AC bonding system buss bar. The AC is used to control the monitor so it operates only when the shore cable is plugged into the dock post and there is power available.
3. The small diameter cable with the 4 pin connector plugs into a mating connector on the Zinc Saver. This cable is the sense cable. Through this cable the ground wire test and the galvanic isolator test are performed.
4. The cable from the display unit plugs into the right side of the Main Control Unit.
VERIFICATION TEST 1. If the monitor system is being used without a bonding system monitor through hull sensor (typical) the Bonding System enable switch must be off. This switch is located on the left end of the main unit (as looked at to read the text). Off is in the down position.
2. Remove the shore cord from the dock post.
3. Switch on the AC sense bypass switch. This switch is located on the left end cap of the main unit. On is up.
4. The ProSafe Monitor will do a self test then test the Galvanic Isolator then test for ground wire – neutral wire continuity test. You can view the self test of the unit by watching the monitor illuminate the display LEDs in a sequence: Ground wire NORMAL, ground wire FAIL, Galvanic Isolator NORMAL, Galvanic Isolator FAIL, pause for a moment and then Galvanic Isolator FAIL. Self test following this sequence assures proper operation of the ProSafe Monitor. After the self test there is a pause of about 6 seconds and then a display of the actual test results. Because we have unplugged the shore cord and turned on the AC sense bypass switch we should experience a ground wire FAIL and a Galvanic Isolator NORMAL.
5. In this step we will simulate a good ground wire. PLEASE, DO NOT STICK ANY WIRES OR TOOLS INTO ANY DOCK POST OUTLET OR INTO ANY TYPE OF AC POWER CONNECTOR. We will be hooking to male shore cord (pins exposed) connectors. Using a short test lead with clips, a large clip by itself or even a bare piece of wire, short the ground prong (G) to the neutral prong (N) on the end of the shore cord. Press the TEST button on the display. After self test and equipment test the monitor will show ground wire NORMAL and a Galvanic Isolator NORMAL.
6. This concludes the verification process. To prepare the ProSafe Monitor for normal operation the bypass switch (left end plate of the Main Control Unit) must be placed into the down, or off, position. The jumper wire you attached to the male plug of the shore cord can be removed and the shore cord plugged into the dock post.
Ground wire failure when plugged into the dock post. Dock wiring troubleshooting. If upon plugging into the dock post you experience a Ground Wire FAIL condition the dock wiring must be inspected. There are two known conditions that will create a FAIL.
1. The green (ground) wire is not connected to the white (neutral) wire and to earth at the dock side breaker box. This is per the National Electrical Code that the green (ground) be connected to the white (neutral) at this point.
2. There is more then 17 volt AC between the green and the white wires on the boat. This is an abnormal condition and would typically require a system voltage drop of 34 volts overall to attain. This is unlikely as it would bring the panel voltage down to less then 85 volts. It is mentioned because of the possibility that loads are improperly balanced in the dock system.
For the technically inclined. ALL testing is done upon plug in of the shore cord and every six hours that the shore cord is plugged in, or anytime the TEST button is pressed. Each test lasts 1.5 seconds. During the ground wire test the control unit does a continuity test between neutral and ground. If there is continuity then the display shows a NORMAL if there is not continuity then the display shows a FAIL.
If you have any problems beyond this please do not hesitate to call for technical assistance. For more information call 603-433-4440. |
Online Resources
-

ProMariner Catalog
-

Mobile Catalog


